Hey guys,
I hope you are wrapping up January on a positive note. Me, it's business as usual around here. Remember back during this post when I talked about my word of the year and being intentional in my actions. I've spent a good month thinking and journaling about what that means for this blog. I'm so excited to continue my growth in this business and to provide you, my readers, with content that you want and need.
So, today I have set up a quick survey for you to take so that I can better understand what you enjoy. I promise, these questions are all vital in adapting to what The Fogue Abode is going to be this year. I also promise that all the information you provide will be confidential and will solely be used for this blog. I would never sell your information to an outside company.
Create your own user feedback survey
Tuesday, January 24, 2017
I Whitewashed Some Brick And I Liked It!
This post contains affiliated links.
No, my boyfriend won't mind it.
So maybe Katy Perry's boyfriend wouldn't mind my latest paint brush victim, but the hubby was totally "Mhhh" about the transformation. Which sorta bumbed me out; and then I got over it because I love it so.
Guys!
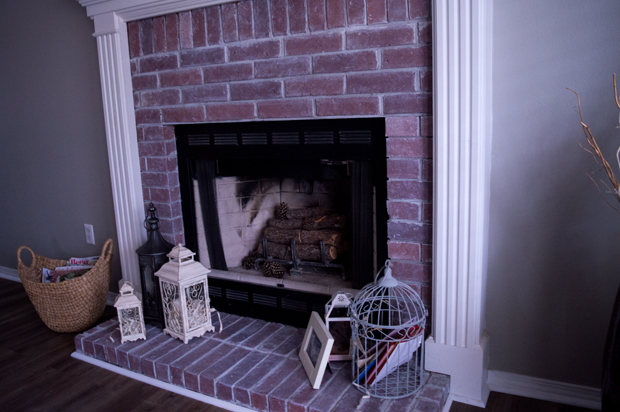
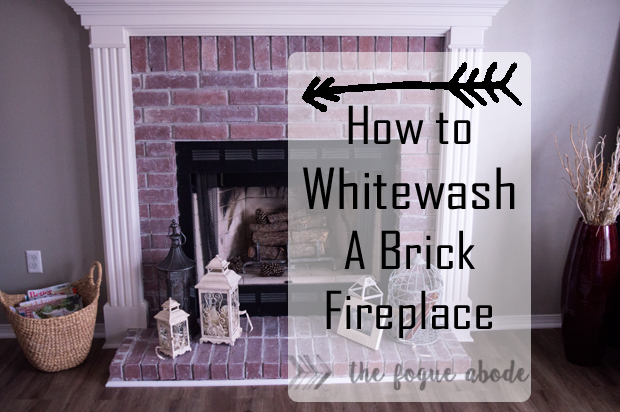 Saturday, I finally broke out the paint and paint brush to tackle a project I have been contemplating for 3 whole years! When we moved into our house and attacked all the walls with grey paint, I knew the fireplace was just too warm for the look I was going for. But something deep down in me liked the bright red of the traditional brick. That, and I a fear of doing something more permanent.
I am trying to live by a new mantra this year, to be intentional. That means trying to figure out just what being intentional with my décor really looks like. That is a topic for a whole other post. One thing is certain, I have been trying to move in a more farmhouse/industrial direction and the warm tones of the red brick was just hurting that vibe.
So I whitewashed my fireplace.
Can I share with you how fun and easy this project was? Duh, that's why I'm here.
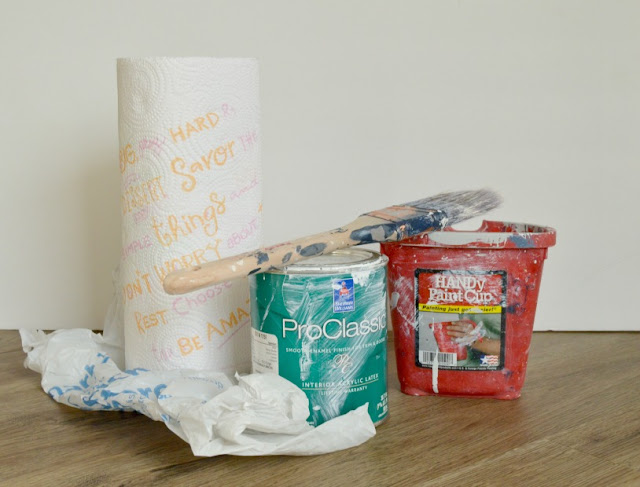
To get started, you'll need to gather your essential ingredients.
White Paint from your paint cabinet
Handy Paint Cup that has been well loved
Old Paint Brush that has also seen better days
Paper Towels
Plastic Bag to gather paper towels
Any latex paint will due for this project. I always keep a quart can of Sherwin Williams ProClassic Interior Acrylic paint in my paint cabinet. You know for any trim touchups or cabinet scuffs. So I used this paint. I also grabbed an old Purdy paint brush. You can use a stiffer brush if you want fuller coverage, but I wanted the chippy look and didn't care to get in every nook and cranny of the brick.
The key to whitewashing brick is your paint to water ratio. Most articles that I read while doing my research suggested a 1:1 ratio. I, however, wanted the red of my brick to bleed through more, so I went with a 1:3 water ratio. Make sure to mix it up real well.
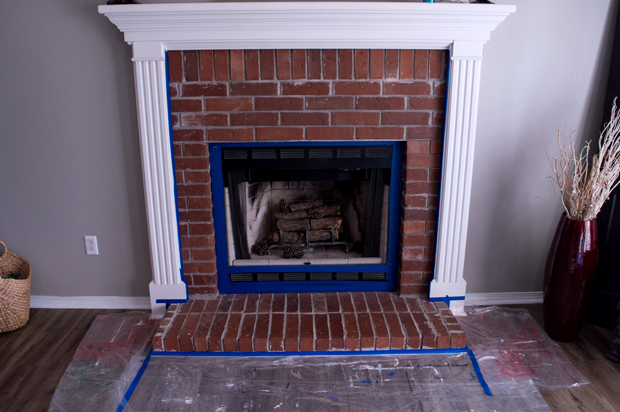
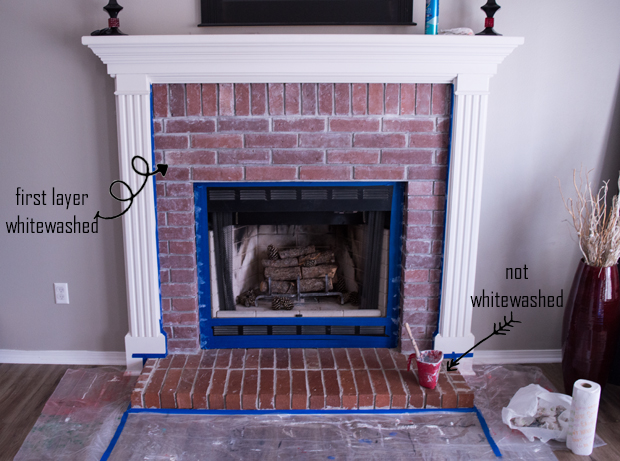
Cover and tape off as much as you possibly can that is exposed to the brick. Normally I don't advocate the use of so much painters tape or tarp, but in this case you'll need it. Your paint is super thin because of the water.
I suggest you start on the side, just to get your technique down. And as is my case, to make triple sure that I wanted to whitewash my brick.
Ready? Set? Whitewash!
The technique is quite simple. Load your brush and whip off as much as possible in your can. When you think you've unloaded it enough, whip some more. Trust me.
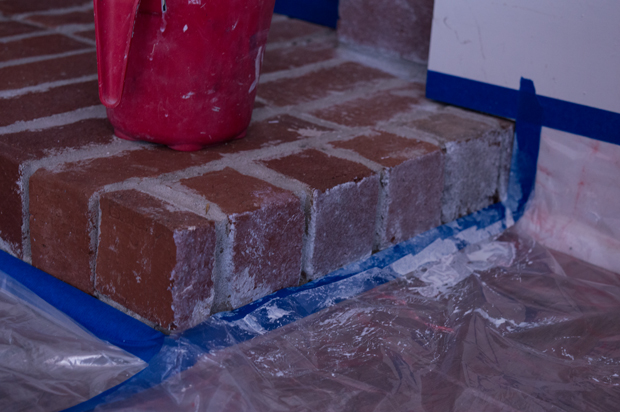
Start with painting the grout of your brick and then the brick itself. Use your paper towel to dab off the paint on the brick. I did the entire fireplace facing working row by row, dabbing with my paper towel as I went.
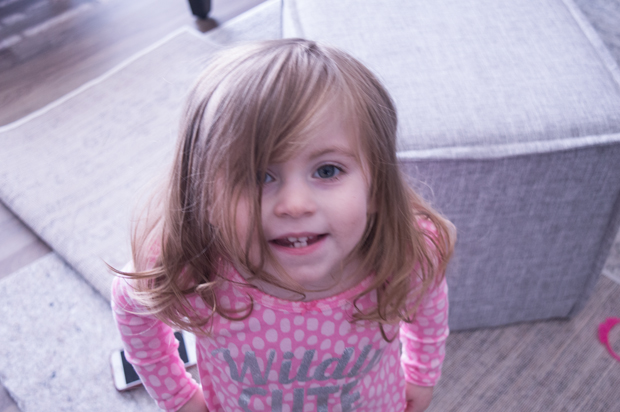
Then you stop and take a picture of your cute toddler because, well, she wants her picture taken.
Now back to the show.
And then you start the second coat, this time just working along the brick. Continue to dab with your paper towel.
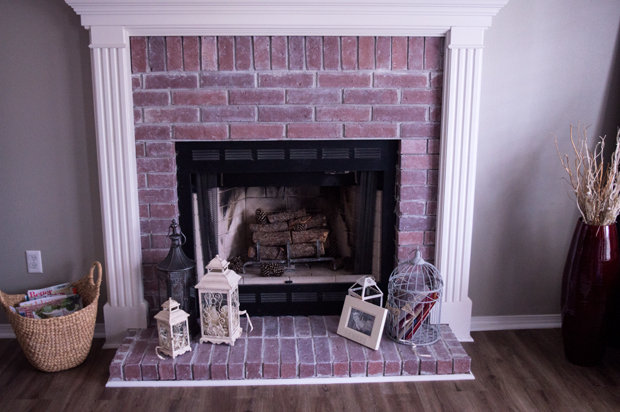
Once I finished the entire brick facing of the fireplace, I let it dry for several hours before I declared this project complete.
Do you have some brick in your home that you're itching to whitewash? I would love to see your projects.
Posted by
at
11:04 AM
Labels: DIY, fireplace, whitewash
Friday, January 20, 2017
{Five} Things I Learned My First Year of Blogging
Oh, hey! Yeah I missed my blog relaunch anniversary date last week! But it's not too late to celebrate. Whoo Hoo, I actually stuck with it! In honor of my first full year of blogging, I wanted to do a small shoot-off from my normal posts to bring you the five things I learned in my first year of blogging.
Once I really dug into the business of blogging, I quickly learned that there is so much more than what meets the eye. Blogging isn't just about great content anymore. It's about photography, marketing, networking and more HTML verbiage than I cared to ever learn.
Just like a toddler, I still have so much to learn about this business. Yet, I do have a few little tid-bits I have managed to put into practice this past year that has helped grow my blog.
So here goes, the five things I learned my first year of blogging.
It's All About the Appearance
You know the saying a picture is worth a thousand words, well that statement couldn't be any more true in blog-land. Photography may be the one area where I have grown the most, yet have the most still to learn. No blog post is worth a hill of beans without some sort of picture in it.
It's not just about snapping a photo, but also about editing. This year I made the leap to a DSLR, my handy dandy to be exact. The day I opened the box, I snapped it into Manual and haven't looked back.
But like I said, the camera is only half the equation. I also started my journey with . If you are ready to take the editing game serious but not THAT serious, Elements is the way to go. It's the perfect tool for bloggers who do hobby photography and simple graphic designs at a much cheaper price than the full monty Photoshop.
Promote, Promote, Promote
The second pearl of wisdom I have learned this year is the importance of promoting your content. This was a hard concept for this modest introvert to grasp. But it's important to get your work out there and the only way that's going to happen in the beginning is by you sharing it.
I have discovered some great programs that help me with my shares. If you're starting out just like I am, check out Sumo Me, Hoot Suite and Tailwind. There are hundreds of different programs out there, but these have been my go to as a newb.
Is consistency really key?
Here's another little nugget I've been chewing on recently. In all the research I've done, articles I've read and podcasts I've listened to about blogging, one of the key's that continuously pop up is consistency. But besides a broad scope, is posting every set number of days really that important to a newbie?
I recently took the stance that I would rather produce good content then to mass produce gibberish for the sake of meeting a weekly deadline. This mantra has taken a huge load of stress off my shoulders and helped me focus on content I really want to produce. Yes, there is a drop in my weekly page views, some weeks it's limited and others it's higher than normal. But my post views count have really increased.
The Importance of Networking
I had to adjust my mindset of what I thought blogging was and treated it like a business. I mean that's what I wish for this space to eventually become. A key to any business is networking. Over the course of the year, I have joined in some wonderful groups of bloggers. There are many way's to find your "tribe" or "mastermind." I started with a google search which lead me to Arkansas Women Bloggers, a sub-group to the much larger The Women Bloggers, LLC. I also found several facebook groups by just searching.
But getting there is only have the journey. You don't learn and you don't grow unless you get involved. It was intimidating at first, I'll admit that. But jumping in was my goal and continues to be my goal for 2017.
This is a learn as you go business.
I can't say enough that my biggest learning curve was just going out there and doing it. The good ol' hands on approach. I have made more than my fair share of mistakes.
Pictures that are too small, over editing, white balance.
Forgetting to proof-read, not being consistent in my story telling layout.
I think my biggest mistake is getting over excited and posting before it's truly ready.
And there are other areas that I still wish I could change. Is it better to be on Wordpress? Probably, but I'm here now. Should I be more organized? Do I need a round up of content? Sure. There are a lot of things I can and will change in 2017. But it's the experience of doing it the wrong way that's taught me more than anything.
Well there you go, word vomit of my five biggest lessons I learned while blogging my first year.
Fellow bloggers, what were your biggest lessons your first year of blogging?
Are you thinking of starting a blog? Do you have any questions?
Once I really dug into the business of blogging, I quickly learned that there is so much more than what meets the eye. Blogging isn't just about great content anymore. It's about photography, marketing, networking and more HTML verbiage than I cared to ever learn.
Just like a toddler, I still have so much to learn about this business. Yet, I do have a few little tid-bits I have managed to put into practice this past year that has helped grow my blog.
So here goes, the five things I learned my first year of blogging.
It's All About the Appearance
You know the saying a picture is worth a thousand words, well that statement couldn't be any more true in blog-land. Photography may be the one area where I have grown the most, yet have the most still to learn. No blog post is worth a hill of beans without some sort of picture in it.
It's not just about snapping a photo, but also about editing. This year I made the leap to a DSLR, my handy dandy to be exact. The day I opened the box, I snapped it into Manual and haven't looked back.
But like I said, the camera is only half the equation. I also started my journey with . If you are ready to take the editing game serious but not THAT serious, Elements is the way to go. It's the perfect tool for bloggers who do hobby photography and simple graphic designs at a much cheaper price than the full monty Photoshop.
Promote, Promote, Promote
The second pearl of wisdom I have learned this year is the importance of promoting your content. This was a hard concept for this modest introvert to grasp. But it's important to get your work out there and the only way that's going to happen in the beginning is by you sharing it.
I have discovered some great programs that help me with my shares. If you're starting out just like I am, check out Sumo Me, Hoot Suite and Tailwind. There are hundreds of different programs out there, but these have been my go to as a newb.
Is consistency really key?
Here's another little nugget I've been chewing on recently. In all the research I've done, articles I've read and podcasts I've listened to about blogging, one of the key's that continuously pop up is consistency. But besides a broad scope, is posting every set number of days really that important to a newbie?
I recently took the stance that I would rather produce good content then to mass produce gibberish for the sake of meeting a weekly deadline. This mantra has taken a huge load of stress off my shoulders and helped me focus on content I really want to produce. Yes, there is a drop in my weekly page views, some weeks it's limited and others it's higher than normal. But my post views count have really increased.
The Importance of Networking
|
|
| An event I was able to attend thanks to Arkansas Women's Bloggers. |
I had to adjust my mindset of what I thought blogging was and treated it like a business. I mean that's what I wish for this space to eventually become. A key to any business is networking. Over the course of the year, I have joined in some wonderful groups of bloggers. There are many way's to find your "tribe" or "mastermind." I started with a google search which lead me to Arkansas Women Bloggers, a sub-group to the much larger The Women Bloggers, LLC. I also found several facebook groups by just searching.
But getting there is only have the journey. You don't learn and you don't grow unless you get involved. It was intimidating at first, I'll admit that. But jumping in was my goal and continues to be my goal for 2017.
This is a learn as you go business.
I can't say enough that my biggest learning curve was just going out there and doing it. The good ol' hands on approach. I have made more than my fair share of mistakes.
Pictures that are too small, over editing, white balance.
Forgetting to proof-read, not being consistent in my story telling layout.
I think my biggest mistake is getting over excited and posting before it's truly ready.
And there are other areas that I still wish I could change. Is it better to be on Wordpress? Probably, but I'm here now. Should I be more organized? Do I need a round up of content? Sure. There are a lot of things I can and will change in 2017. But it's the experience of doing it the wrong way that's taught me more than anything.
Well there you go, word vomit of my five biggest lessons I learned while blogging my first year.
Fellow bloggers, what were your biggest lessons your first year of blogging?
Are you thinking of starting a blog? Do you have any questions?
Posted by
at
9:20 AM
Labels: blogging
Wednesday, January 18, 2017
How to Create a Crepe Paper Swag {Part Two}
I'm back again today with the second part to creating the crepe paper swag that we used for Aspen's Boho Chic Birthday Bash. The juicy part to this arrangement are the flowers. I loved how they came together. Each petal creating the beautiful roses and peonies. Ok, I'm a nerd satisfied by the simplest of things.
If you've been following along, last week I showed you how to make the greenery that we used on the swag. Today, I'm here with a step-by-step guide on how I made the flowers that I used not only for the swag, but also for the flower crown on the deer skull.
Here's what you will need to make delectable paper peonies.
Crepe Paper in Pink, Cream and Green
Scissors
Floral Wire
Hot Glue
Petal Templates from The House That Lars Built
I want to start out by cutting out all of my petals for the Peony. Here, I used two different colors for an ombre effect. But, you can use any color that you wish. For this guide, I'll use cream for the inside of the flower and fade to pink for the outside.
The easiest way to cut out all my petals is to do it all at once! First, I cut out a strip of my cream crepe paper.
Then folded it, accordion style, to the size of my petal. Make sure the grain of the paper is vertical to the petal. This will be important later on. Cut it out.
To make the Peony, you'll need to cut out 3 small petals, 5 medium petals and 4 large petals. You can see here that I used the cream for my small petals, mixed cream and pink for the medium petals and used pink for all my large petals.
Next, take a 2 inch by 5 inch piece of your green crepe paper and cut slits about half way down. This will be the center of your flower.
Hot glue the solid end of the paper to your floral wire and wrap it around, securing it with another dab of hot glue.
I tried many different types of glue for these flowers, but found that hot glue bonded the strongest and dries thefastest for the material we were working with.
Next, you want to use your thumbs to stretch out your petals and give them that petal-y shape.
See the difference in the one that's stretched and the one that isn't. These are looking more life like now.
Take your smallest petals and with a dab of glue along the bottom, wrap it around your flower stem.
Repeat this process with the rest of your small petals, working your way about a 1/4 of the way around each petal.
Now you have a nice little flower bud.
Continue with the above steps, using your cream medium petals then your pink medium petals and finally your large pink petals.
Once your flower is assembled, us your thumbs to loosen up the flower. As a final touch, use a bit more of your green paper to make leaves which you can attach to the base of the flower.
My arrangement used a mix of peonies which I have created here and Lisa Griffith's Garden Roses
To secure your flowers to the swag base, use the remainder of the floral wire to wrap around your base, bunching your flowers together. I started in the middle with my largest peony and worked my way out.
If you've been following along, last week I showed you how to make the greenery that we used on the swag. Today, I'm here with a step-by-step guide on how I made the flowers that I used not only for the swag, but also for the flower crown on the deer skull.
How to Make Crepe Paper Peonies
Here's what you will need to make delectable paper peonies.
Crepe Paper in Pink, Cream and Green
Scissors
Floral Wire
Hot Glue
Petal Templates from The House That Lars Built
I want to start out by cutting out all of my petals for the Peony. Here, I used two different colors for an ombre effect. But, you can use any color that you wish. For this guide, I'll use cream for the inside of the flower and fade to pink for the outside.
The easiest way to cut out all my petals is to do it all at once! First, I cut out a strip of my cream crepe paper.
Then folded it, accordion style, to the size of my petal. Make sure the grain of the paper is vertical to the petal. This will be important later on. Cut it out.
To make the Peony, you'll need to cut out 3 small petals, 5 medium petals and 4 large petals. You can see here that I used the cream for my small petals, mixed cream and pink for the medium petals and used pink for all my large petals.
Next, take a 2 inch by 5 inch piece of your green crepe paper and cut slits about half way down. This will be the center of your flower.
Hot glue the solid end of the paper to your floral wire and wrap it around, securing it with another dab of hot glue.
I tried many different types of glue for these flowers, but found that hot glue bonded the strongest and dries thefastest for the material we were working with.
Next, you want to use your thumbs to stretch out your petals and give them that petal-y shape.
See the difference in the one that's stretched and the one that isn't. These are looking more life like now.
Take your smallest petals and with a dab of glue along the bottom, wrap it around your flower stem.
Repeat this process with the rest of your small petals, working your way about a 1/4 of the way around each petal.
Now you have a nice little flower bud.
Continue with the above steps, using your cream medium petals then your pink medium petals and finally your large pink petals.
Once your flower is assembled, us your thumbs to loosen up the flower. As a final touch, use a bit more of your green paper to make leaves which you can attach to the base of the flower.
My arrangement used a mix of peonies which I have created here and Lisa Griffith's Garden Roses
To secure your flowers to the swag base, use the remainder of the floral wire to wrap around your base, bunching your flowers together. I started in the middle with my largest peony and worked my way out.
That is how I made the crepe paper flower swag for less than $10. If I were to buy something similar with real flowers, this arrangement would be upward of $100.
Are you loving the return of the crepe paper flowers? I remember these being a big hit when I was much much younger.
Posted by
at
9:17 AM
Labels: crepe paper arrangment, crepe paper flowers, crepe paper swag, How to
Friday, January 13, 2017
How to Create a Crepe Paper Swag {Part One}
Hey Guys Hey! Not only is today Fri-Yay! But it's my birfday! (And Friday the 13th, aren't I so lucky.) As I start my "Farewell to Twenties" tour today with a little fun and food...who am I kidding, probably a little wine too, I wanted to leave you guys with a fun How To that I've been itching to share.
After this weeks birthday post, I received a ton of questions on how I made the crepe paper floral arrangements. It was a fun and easy project, but I'll admit it was time consuming. I'm going to break this down into a few posts for ya.
I had the idea of creating a paper flower arrangement swimming around in my head for several days. Then, I ran across the House that Lars Built's post where they made a paper garland for a get away car and I was completely smitten with the idea.
So today, I wanted to share exactly how I made the leaf base for the swag pictured above. I'll get to the flowers next week.
Start by collecting your materials:
Crepe Paper in 2 shades of Green
Scissors
Floral Wire
Glue Gun
House That Lars Built
Craft Paper for Base (I used a wad of paper that came in a package for my base.)
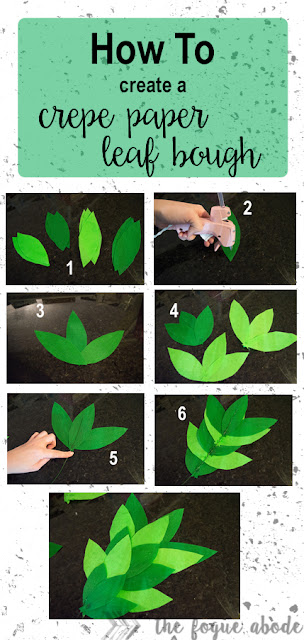
1. Start by using the template and cutting out all of your leaves. I did a mix of color with the large and the small. However, if you just wanted to use one color, that would work too. Time Saver *Don't cut them one at a time. Fold your crepe paper into accordion squares and cut them all at once.* Oh, and don't worry about it looking perfect.
2. Take 3 of the same size and color leaves and use a dab of hot glue to glue them together at the base.
3. Yes, like a marijuana leaf (which I sadly had to spell check because I didn't know how you spelled marijuana.)
4. I glued all of my leaves into 3 bundles so that they were all ready to attach at once. Make sure to bundle the same size and color. You will need 6-7 bundles to make a stem.
5. Take your largest leaf bundle and use it as the base of your stem. I took a piece of floral wire and placed it about 3/4 of the way up the middle leaf. You want the wire to be up more than half way to add some stability to the leaves. Otherwise, they are floppy. We don't need floppy leaves. Then, glue that baby down.
6. Once your base is set, glue the remaining leaves onto your stem going from largest to smallest. Make sure to leave a little wire at the end to secure it to the base of the swag or arrangement.
Congratulations, you have your first leaf stem. Isn't it ugly? Keep going, I promise it will all come together in the end.
Repeat the steps above to make as many as you need. Our swag took 6 stems plus a few individual leaves.
To bundle them, I simply used my craft paper and bunched it into an L shape, leaving a little more on the bottom than the top. I then used the end of the stem and wrapped it around the paper. Twisting it together to secure it. This allowed the stems to hang loosely resembling natural leaves.
Make sure to check back next week as I go over how to create crepe paper flowers.
(In my best Mickey Mouse voice) "See ya real soon."
After this weeks birthday post, I received a ton of questions on how I made the crepe paper floral arrangements. It was a fun and easy project, but I'll admit it was time consuming. I'm going to break this down into a few posts for ya.
I had the idea of creating a paper flower arrangement swimming around in my head for several days. Then, I ran across the House that Lars Built's post where they made a paper garland for a get away car and I was completely smitten with the idea.
So today, I wanted to share exactly how I made the leaf base for the swag pictured above. I'll get to the flowers next week.
How to Make a Crepe Paper Leaf Bough
Start by collecting your materials:
Crepe Paper in 2 shades of Green
Scissors
Floral Wire
Glue Gun
House That Lars Built
Craft Paper for Base (I used a wad of paper that came in a package for my base.)
1. Start by using the template and cutting out all of your leaves. I did a mix of color with the large and the small. However, if you just wanted to use one color, that would work too. Time Saver *Don't cut them one at a time. Fold your crepe paper into accordion squares and cut them all at once.* Oh, and don't worry about it looking perfect.
2. Take 3 of the same size and color leaves and use a dab of hot glue to glue them together at the base.
3. Yes, like a marijuana leaf (which I sadly had to spell check because I didn't know how you spelled marijuana.)
4. I glued all of my leaves into 3 bundles so that they were all ready to attach at once. Make sure to bundle the same size and color. You will need 6-7 bundles to make a stem.
5. Take your largest leaf bundle and use it as the base of your stem. I took a piece of floral wire and placed it about 3/4 of the way up the middle leaf. You want the wire to be up more than half way to add some stability to the leaves. Otherwise, they are floppy. We don't need floppy leaves. Then, glue that baby down.
6. Once your base is set, glue the remaining leaves onto your stem going from largest to smallest. Make sure to leave a little wire at the end to secure it to the base of the swag or arrangement.
Congratulations, you have your first leaf stem. Isn't it ugly? Keep going, I promise it will all come together in the end.
Repeat the steps above to make as many as you need. Our swag took 6 stems plus a few individual leaves.
To bundle them, I simply used my craft paper and bunched it into an L shape, leaving a little more on the bottom than the top. I then used the end of the stem and wrapped it around the paper. Twisting it together to secure it. This allowed the stems to hang loosely resembling natural leaves.
Make sure to check back next week as I go over how to create crepe paper flowers.
(In my best Mickey Mouse voice) "See ya real soon."
Posted by
at
1:18 PM
Labels: crepe paper arrangment, crepe paper flowers, crepe paper leaves, crepe paper swag, How to, leaf bough
Wednesday, January 11, 2017
A Boho Chic 2nd Birthday
What do you get a two year old who just had a massive Christmas, for her January birthday? "A Pawty!" Atleast, that's what she said she wanted while running around screaming at everyone that she's "two" and holding up both index fingers.
What kind of "pawty" did we settle on for Aspen's 2nd birthday? A Boho Chic party filled with teepees, feathers and dream catchers. Remember the too-cute teepee Aspen got last year for her first birthday? It's quite possibly her favorite item, which became inspiration for her party theme.
I had a friend of mine create her invitations which we then printed through Walmart.com (I wanted the matte finish which had to be shipped to me.) Make sure you go and check out ! She does some awesome custom party designs.
For the party venue, we rented a building at our local fair grounds to host our 40+ invited guests. After cramming all of our guests into our house last year, I wanted a more open space with more seating. Since we celebrate in January, anything out doors was out. Especially when the temperature was as low as this past weekend. That left very few options for us to chose from, but we made do.
For decorations, I was inspired by the bohemian style skulls with flower crowns. Luckily, Chris likes to hunt so we had a few deer skulls just laying around the house. Begging to have flower crowns! This one really told me that (or it may have been a sugar induced post Christmas hallucination, who knows.) I DIY'ed the peony flowers to make the crown (which I'll post about later.)
I used the same flower concept to create the swag along the backdrop. I finally learned that those things are called swags. Apparently if you call them spray's when googling the idea, you come up with funeral flowers. I used Crafted Sophistication's tutorial on making the crepe paper garden roses and used a mix of pink and cream along with the peony's.
I also added mint, peach and polka dot gold poofs along the backdrop which I found with this on Amazon for $20. It included the poofs, the garland and the streamers.
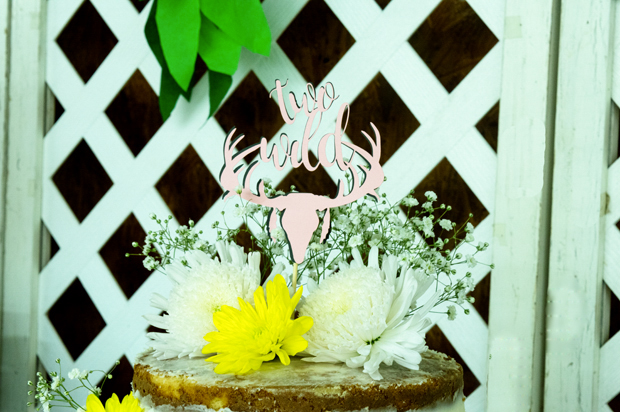
Can we discuss the cake? I am infatuated with naked cakes. They look so rustic and well, bohemian. I knew that this should be the birthday party cake. And totally DIY-able. All I had to do was add the flowers and the cake topper. I made this cute "two wild" cake topper with a pink and a charcoal piece of cardstock, a wooden skewer and a Cricut Explore Air™ machine. It was totally simple to make using the Cricut Design Space™.
I was also able to make the cup cake toppers with toothpicks and Cricut cutouts. I ordered a few plain vanilla and chocolate cupcakes from our local grocery to go along with our cake.
In addition to the cake and cupcakes, we just served fruit, cookies, made by , and macaroons.
I really liked having an easy-peasy menu set up this year. After serving brunch for last year's party, which was so much fun but exhausting, I wanted to have a simpler plan this year.
Table set ups were much easier too this time. I loved having more space to really spread some tables out. I used a simple burlap runner, some cut-offs from a tree in our yard and a grocery store flower arrangement.
I wanted to give the kids a special place to sit. So, I used 3 pallets laid out on fun granny floral sheets that I borrowed from my mom to give it that authentic boho feel. This became the kid's table.
Each place setting included their plates, utensils, juice/yahoo and a coloring book and crayons.
Moving on to the front table, I wanted to really show off our birthday girl.
As Aspen's guests arrived, we had this table set up. One tradition we started last year was leaving notes and wishes for the birthday girl. Last year, we used hearts which went with her Sweetheart birthday theme. This year, I cut out feathers and we strung them to her dream catcher.
In the basket on the middle shelf, we had flower crowns and feather headbands for all of Aspen's tiny guests. It was so cute seeing all the little Boho babes running around. The boys even loved their Indian feather headbands too.
All of the framed signs I made using my Photoshop Elements 14.
As a thank you for attending the party, Aspen gave each of her guests fun little buckets full of her favorite things: bubbles, play-dough and whistles. I got these cute mini buckets at the Dollar Tree which made great treat bags.
The whole day was such a hit. I didn't even sob once...well not at the party at least. I really can not believe that my little baby is two already. I know that's such a cliché thing to say. But being a mom, it's never been more true. It is such a joy just enjoying life with her right now.
Ok, enough with the sappy stuff before I start crying again. Here's a few more pictures from the party, this time with all the pawty-people!
Boho Party Sources
Invitations -
Design - Me
Cakes - Me & Walmart
Cookies -
Outfit - Matilda Jane Joanna Gaines Collection
This post contains affiliate links.
Posted by
at
12:29 PM
Labels: 2nd birthday, birthday party, boho birthday, boho chic
Subscribe to:
